TESTS
WHAT YOU NEED TO KNOW
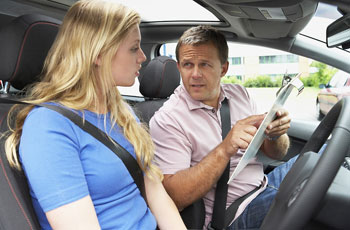
Practical Test
Costs
CarPrices in accordance with the DVSA website
The DSA Show Me Tell Me Test - Questions and Answers
The DSA Show me, tell me questions test your knowledge on basic car maintenance and safety. At the start of the practical driving test the show me, tell me questions will begin. The driving test examiner will ask you two questions, one show me question and one tell me question. Answer any of these two questions incorrectly and you will gain one driving test fault. There are 19 different questions, which can be asked, in 18 different combinations. Below you will find all the show me, tell me questions and answers.1) Gentle pressure on the steering wheel, maintained whilst the engine is started, should result in slight but noticeable movement as the system begins to operate.
2) Turning the steering wheel after just moving off will give an immediate indication that the power assisted steering is functioning correctly.
A. A safe tyre will have no cuts or bulges. The tread depth should be at least 1.6mm across the central 3/4s of the breadth of the tyre and around the entire outer circumference.
A. Operate switch (turn on dipped headlights and ignition if necessary). Check warning light is on. Explain use.
- eyesight- if you are unable to read the number plate the examiner will not be able to conduct the rest of
the test.
- Safety checks - The examiners will ask you two questions about carrying out safety checks on your
vehicle before the start of your test.
Special Excercises
You'll be asked to carry out two of the following exercises during your test. These will take place at carefully selected places .
- - your examiner will ask you to pull up and explain the exercise and ask you to carry it out.
- reversing round a corner.
- turning in the road.
- reverse parking (either in a bay at the test centre or on the side of the road).
- emergency stop -you may be asked to carry out an emergency stop.
Your practical driving test will include approximately 10 minutes of independent driving.
During your test you’ll have to drive independently by either following:
- traffic signs
- a series of directions
- a combination of both
The independent driving route
If you ask for a reminder of the directions, the examiner will confirm them to you.
If you go off the independent driving route it won’t affect the result of your test unless you commit a driving fault.
If you go off the route or take a wrong turning, the examiner will help you to get back on the route and continue with the independent driving.
If there are poor or obscured traffic signs, the examiner will give you directions until you can see the next traffic sign - you won’t need to have a detailed knowledge of the area.
You can’t use a sat nav for independent driving as it gives you turn-by-turn prompts. Independent driving tests how you make your own decisions.
Special needs
The Driving Standards Agency (DSA) has procedures to identify special needs and disabilities when tests are booked online or over the phone. The examiner then knows which type of special needs you have so reasonable adjustment can be made.
For the independent driving section, this could be by asking you which method you prefer - following traffic signs or a series of directions (a maximum of three), which are supported by a diagram. In some cases this may be shortened to just two directions.
Driving examiners are very experienced at dealing with candidates who speak little or no English. For example, sometimes they will write place names so it is clear to you where you’re being asked to drive to.
You can have an interpreter along with you on your test if you wish. Your approved driving instructor can act as your interpreter.
How your driving test is assessed.
Your examiner will assess any errors you make and, depending on how serious they are, record them on the
driving test report form. You'll fail your test if you commit a serious or dangerous faults. You'll also
fail if you commit more than 15 driving faults.
REMEMBER
Special rules under the new drivers act apply for the first two years after you have passed your test.
New Drivers Act
Your licence will be revoked if you receive six or more penalty points as a result of offences you commit within two years of passing your first practical test. This includes any offences you may have commit within two years of passing your first practical test. This includes any offences you may have commited before passing your test.
REMEMBER
- you will get minimum of three penalty points for speeding - two speeding offences means six points.Theory Test
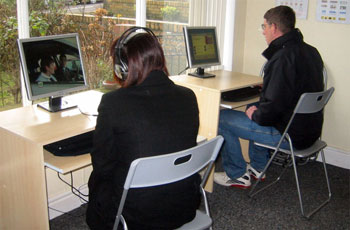
The Theory test is a screen-based test, and consists of two parts. It has been devised to test the knowledge of driving theory, in particular the rules of the road and best driving practice.
Multiple Choice Questions
The first part of the theory test consists of 50 multiple choice questions. You select your answers for this part of the test by simply touching the screen. This 'touch screen' has been carefully designed to make it easy to use.Before you start this part of your test you'll be given the chance to work through a practice session for up to 15 minutes to get used to the system. Staff at the test centre will be available to help you if you have any difficulties.
The questions will cover a variety of topics relating to road safety, the environment and documentation. Only one question will appear on the screen at a time. Most questions will ask you to mark one correct answers from the a selection, but this is shown clearly on the screen. If you try to move on without marking the correct number of answers you'll be reminded that more answers are needed.
To answer, you need to touch the box alongside the answer or answers you think are correct. If you change your mind and don't want that answer to be selected, touch it again. You can then choose another answer. Take you time and read the questions carefully. You're given 57 minutes for this part of the test, so relax and don't rush.
Some questions will take longer to answer than others, but there are no trick questions. The time remaining is displayed in the screen.
You'll be able to move backwards and forwards through the questions and you can also 'flag' questions that you?d like to look at again. It's easy to change your answer If you want to. Try to answer all the questions. If you're well prepared you shouldn't find them difficult.
Before you finish this part of the test, if you have time, you can use 'review' feature to check your answers. If you want to finish your test before the full time, touch the 'review' button and then the 'end' button on the review screen. When the touch the review button you will see the following screen.
Hazard Perception
The hazard perception (or awareness) test consists of 14 video clips, each about a minute long. Each clip shows driving situations involving other road users and is shot from a car driver's point of view. As each clip plays a hazard - something that will cause the driver to change speed, direction or stop will develop.In 13 of the clips you will have one hazard to identify, in the other, two. You will not be told which hazard perception test clip is the two hazard clip.
You identify the correct hazard or hazards by clicking on either the left or right mouse button. The earlier you identify the correct hazard or hazards the more you score. The scoring goes from five to zero points.
Don't think you can continuously and frantically smoother the screen with clicks as the hazard perception clip plays. If you do you will score zero. However, you will not lose points for clicking on other potential hazards that may also be seen.
So, you watch a clip and in that clip you will see several potential hazards unfolding. Most will stay exactly that, potential hazards but one (or two) will become an actual hazard and cause the vehicle (the camera shot, the driver's point of view) to change speed, direction or stop. This is the hazard you must click on in order to score points. Clicking on the potential hazards will neither score you points nor lose you points.